f

How to Display Author image in Google Search Results

Display your Profile image in Google Search Results

Verify Google Authorship To show Your Profile image On Google Search Results

Now a days all the bloggers have an interest to make their profile image in Google search results. because it will increase the traffic to their blogs and websites, and build the readers or visitors to search out the blog simply.

Google Web Search result snippet showing authorship information

It is very easy method to make your image appear on Google search results. Follow the steps below:

1. Create Google plus profile (if you haven’t already) Click Here for create Google Plus Page

2. First add your Google plus Profile link anyplace on your blog sidebar using the following code:

<a href="Google Plus profile Link" rel="author" target="_blank"> Join me on Google+</a>
Replace Google Plus profile Link with your profile link  and Change join me on Google+ with your link or images
This is how it looks on the blog:

google plus link in sidebar


3. Create "About me" or "author page" on your site (if you haven’t already).here is my About page that i used, and link the about page to your Google Profile page using the rel=”me” tag. and upload a image into about page.
<a href="https://profiles.google.com/YOURID" rel="me">My Google+ Profile</a>

Note: you need to place your Google Id in place of ”YOURID” . to get your id click profile on left menu on your google+ page. now look at the url.

profile id

You’ll also want to place a link back to your bio page in your blog, with a rel tag that says “author”.
<a href="http://bloggerknown.blogspot.com/p/about.html" rel="author">About Me</a>
Note: you need to place your about page in place of ”http://bloggerknown.blogspot.com/p/about.html”.

This is how it looks on the blog:

about link in footer

4. Now go to your G+ profile and click the About page scroll down here you will see Links click Edit and
Cross-Links via Google Plus Profile

Add your blog homepage url and additionally the url of your about us page. you can also add your Facebook and twitter links if you want.

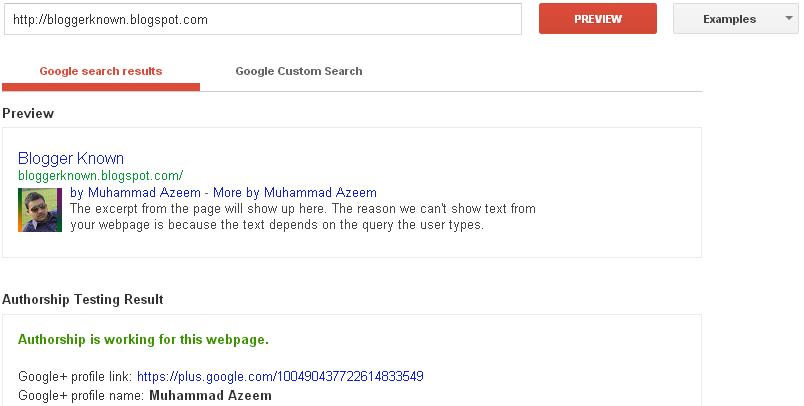
5. Now go to Google Rich Snippet Testing Tool. and submit your homepage link in the search box and hit preview as shown below,
Google rich snippets tool results

You will notice Verified: Authorship markup is verified for this page and that shows you have successfully implemented this feature for your blog.

Note:: It wil take some 48 hours for this options to work, so please wait.

Please use comments box to ask anything if not cleared and share your valuable thoughts.

Source

How to Create Facebook Page for Website/Blog and Business

Facebook Fan PageFacebook is the world's second largest website after Google and no one social media website. Nowadays the all internet users use Facebook. Every business since everyone is special and a common man uses Facebook.A Facebook page is a perfect way to connect with your customers on Facebook,

How do I create a Facebook page for website/blog and my business?


1.Log in to your Facebook account. Your new page will be linked to this account, and any changes you make to your account will need to be done after you log in.

2. go to https://www.facebook.com/pages/create

3. Here you can select any category according to your business.

Pick a category from the following list:

  • Local Business or Place
  • Company, Organization or Institution
  • Brand or Product
  • Artist, Band or Public Figure
  • Entertainment
  • Cause or Community


How to Create Facebook Page

For example, to create a page for your blog or website
4. The first step is to choose what style of page you may produce. select “Brand, Product, or Organisation”, and select the ‘Website’ profile within the in the menu.
Select Brand or Product for website

5. Give your page a name, and agree to the Facebook pages terms and click Get Started
6 .On the Next Page, Upload an Image for your Fan Page and other setting, it is exactly the same for your Facebook profile.
7. You'r page is now ready and how do you change the page usernames & page web address
First page webaddress link of your page like this https://www.facebook.com/pages/Name/(ID)108248082539363
How do we can change?
For that we should need 25 like for page
1. Enter you page account
Enter your account
2. go to Edit Page > Update Info > Basic Information here you can view user name You can now direct people to
click Change username and enter your page name like "bloggerknown"

Now you can update your blog status of the page.
Thank you all if any doubts please leave comments. for more detail please click here

Submit Website Sitemap To Webmaster Tools

How to Add Blogger Blog and Website to Google Webmasters Tools

Submit Website Sitemap to Google Webmaster tools is a must for anyone that want to be successful. Once you get verified your site to webmaster tools, then automatically get indexed your site to Google search engine. When your site come to search engine then you will get a lot of traffic.

Follow the easy steps to add Website to Webmaster Tools.

If you create blogs using Blogger, you can automatically add and verify sites by enabling Webmaster Tools directly from the Blogger dashboard.

  1. Log in to https://www.google.com/webmasters/tools/ with your Google account.
  2. Click "Add a site...", enter the base URL of your Google Site in the box that pops up, then click "Continue.".
  3. You will be given with many verification methods. select the Alternate methods tab.
  4. Select the option: Add a meta tag to your site's home page
  5. Copy the meta tag (for example, <meta name="google-site-verification" content="z7mJLjVGtEe2qzCzfE1pamxI4H72u18n4XdxEzgl2AJ" />) from the Instructions box.
  6. Leave the verification page open and go to your site dashboard (in a new tab/window).
  7. Paste the meta tag that you copied on the Google Webmasters Tools after <head> tag in your website. ( "Blogger" go to site Deshbord click Templates > Edit HTML > Ctrl + F and find <head> tag after past  meta tag that you copied on the Google Webmasters Tools.
  8. Click on Save Changes.
  9. Go back to the verification page and click Verify.

Submit Blogger Blog Sitemap To Webmasters Tools


An XML sitemap is a fairly simple XML file that contains info about one or additional URLs on your web site. it's updated whenever you post an article and used by Search engines to crawl blog information. Not only Google but also use by different search engines like Yahoo, Bing,etc. if you can create blog on blogger.com then you do not need to create site map and if you can use hosting & other site or manuly create site map use sitemap create tools, I'm using this tool http://www.xml-sitemaps.com.

Follow the easy steps  to submit Sitemap to Google Webmaster Tools.

  1. Sign in to you Google Webmaster Tools account.
  2. Click on the blog.
  3. Navigate to Traffic > Optimization > Sitemaps and click ADD/TEST SITEMAP button and add the following code inside the box :
atom.xml?redirect=false&start-index=1&max-results=100
If you have more than 200 posts then replace value 100 by something bigger number like 500.

You have successfully added Blogspot blog sitemap to Google Webmasters Tools.

Read more: Submit your Websites to Search Engines for Free

Templates - Pakdhe Johny


TEMPLATE FEATURES

Another responsive blogger template from Creating Website with 3 column. This template made in gallery style blogger template, it would be nice if you use this template for your business site. It's a black and white color blogger template, beautiful header and footer, related post thumbnail in each every post, floating social bookmark, 3 column footer and 1 right sidebar. Tag H1 and H2 ready for more SEO and visitor friendly to your blog. You can use this template for your gallery blog, but you can use it for any content if you'd like to. You can use this template for free. And if you have any question about this template visit this link for more detail

Template Name : Pakdhe Johny
Author : Maskolis
Url Instruction : Creating Website
Designer : Creating Website
Url Designer : www.maskolis.com

I suggest you to use an image in each post of your blog, and upload it in Blogger hosted, do not save or host your image in other sites, it can not work.

Save any javascript in this template with your own Google Code or another file hosting for better result. Read this tutorial to save Javascript in to your own Google Code.

And if you found no answer in this blog, visit my other blog in maskolis.com.

Templates - Johny Ribet


TEMPLATE FEATURES

Johny Ribet is very simple responsive blogger template with 2 column. It's just a simple template blogger with white and red color, related post thumbnail in each every post, floating social bookmark, 3 column footer and 1 right sidebar. Tag H1 and H2 ready for more SEO and visitor friendly to your blog. You can use this template for your daily blog. You can use this template for free. And if you have any question about this template visit this link for more detail

Template Name : Johny Ribet
Author : Maskolis
Url Instruction : Creating Website
Designer : Creating Website
Url Designer : www.maskolis.com

I suggest you to use an image in each post of your blog, and upload it in Blogger hosted, do not save or host your image in other sites, it can not work.

Save any javascript in this template with your own Google Code or another file hosting for better result. Read this tutorial to save Javascript in to your own Google Code.

And if you found no answer in this blog, visit my other blog in maskolis.com.

Earn Money with Yahoo! Bing Network Contextual Ads Program

Yahoo! Bing Network Contextual Ads Program
Yahoo! Bing Network Contextual Ads Program Best Google Adsense Alternative
Yahoo - the internet company that has its hands on almost any business on the net.) has closed down its publisher network (e.g. yahoo adsense program) in 2010. In Sep 2012, Yahoo declared its partnership with Media.net (the advertising company that manage and operate the Yahoo Bing contextual Advertising program.) to relaunch its publisher network which can be known as Yahoo! Bing Network (YBN) contextual Ads.(online ad network)

If you don’t have an Adsense account and Google Adsense not approved your account than Yahoo Bing contextual ads network is that the best alternatives for your web site to earn cash from advertising. Yahoo and Bing have signed a contract with media.net to give contextual ads for those websites who provide advertising on their sites.

Yahoo! Bing Network Contextual Ads Program

Why you should select Yahoo! Bing contextual Ads Program

  • Keyword Based High Paying Ads
  • Create your Own Advertising Units just like Google Adsense
  • Don’t Have enough Time to Manage your Ads, Put your Advertising Unit on Autopilot Mode
  • Support for Mobile Based Advertisements
  • Use Real Time Website Tracker to Analyze the Performance of your Ads in your Website/Blog

How to Apply for Yahoo! Bing Contextual Ads Program

  1. Anyone can easily Apply for YAHOO! BING Contextual Ads Program and it's very simple further.
  2. visit http://www.media.net Simply click on “Request an Invite” button which appears in Upper Right corner.
  3. Now you will see the Filling Registration Form for Yahoo! Bing Ads, you may need to fill in your personal detials in this form.fill your Name and other details such as your Permanent Address, City and other fields.
  4. You have filled all your details so at last you will see a confirmation message which will appear like shown below along with a message. Let’s see what it says:
Important Note : Due to the extremely high volume of interest that we have received, we currently have a backlog, and hence it may take us up to 2 weeks to get back to you on the status of your invitation request.

It might take more than two weeks to review your application whether or not to approve or disapprove.So show patience till you receive an approval or being rejected email.You can ready to submit upto five Blogs/Websites for review.So let us know what you think about Media.Net in the comment below.

Yahoo Bing Ads Payout Methods

They give you two payment options Paypal and Wire Transfer. The minimum payout threshold is $100 and it's very simple to achieve if you have got an honest traffic.

Templates - Johny Asal Responsive


TEMPLATE FEATURES

Johny Asal Responsive is a simple responsive blogger template with 4 column. There's no new feature in this template, it's just a simple template blogger with black and white color, auto readmore without javascript, 3 column footer and 1 right sidebar. Tag H1 and H2 ready for more SEO and visitor friendly to your blog. You can use this template for your daily blog. Feel free to get this template. And if you have any question about this template visit this link for more detail

Template Name : Johny Asal Responsive
Author : Maskolis
Url Instruction : Creating Website
Designer : Creating Website
Url Designer : www.maskolis.com

I suggest you to use an image in each every post of your blog, and upload it in Blogger hosted, do not save or host your image in other sites, it can not work.

Save any javascript in this template with your own Google Code or another file hosting for better result. Read this tutorial to save Javascript in to your own Google Code.

And if you found no answer in this blog, visit my other blog in maskolis.com.

Templates - Johny Ajaib


TEMPLATE FEATURES

Another simple responsive blogger template with 3 column named Johny Ajaib. It's just a simple template blogger with black and grey color, 2 readmore methods with table of content, 3 column footer and 1 right sidebar. Tag H1 and H2 ready for more SEO and visitor friendly to your blog, and clean design You can use this template for your daily blog. Feel free to get this template. Before you use this template visit this link for customization. Read all tutorial that I gave in there before you get started.

Template Name : Johny Ajaib
Author : Maskolis
Url Instruction : Creating Website
Designer : Creating Website
Url Designer : www.maskolis.com

I suggest you to use an image in each every post of your blog, and upload it in Blogger hosted, do not save or host your image in other sites, it can not work.

Save any javascript in this template with your own Google Code or another file hosting for better result. Read this tutorial to save Javascript in to your own Google Code.

And if you found no answer in this blog, visit my other blog in maskolis.com.

Earn Money Online With Chitika and Blogger

Apply to be a Chitika Publisher!
Chitika is a PPC program with high rate of payment is a free service that displays revenue-earning ads to your web site or blog visitors that includes different types of ads for different types of traffic. it's very the same as Google AdSense but it is a bit different so the best news is that you can have both on the site at the same time. Google AdSense and Chitika can work friendly and do not violate Terms of Use of each service.

Chitika is that the only ad-network that knows when not to show an ad, helping to protect your user expertise.

Why Use Chitika?


Because chitika is the best way to build cash on-line along the Google AdSense. Chitika can show relevant ads at the right time. several bloggers use Chitika to monetize their blogs and sites and Darren Rowse (from ProBlogger) extremely suggest this service to make money online.


Very Low Minimum Payout


Chitika charges advertisers to be featured aboard your site's content. At the end of each month you're paid supported the previous month's earnings (Net 30). Payments are sent once your account earns a minimum of $10.00 (USD) for PayPal payouts or $50.00 (USD) for checks.

Chitika Referral Program


Never forget to use the Chitika Referral Program, which gives you a share from the publishers and advertisers you refer. This becomes an excellent income if you're able to refer others to join this program. 20% of my chitika earnings ar referral earnings that keeps on going although i'm not using Chitika on my blogs.

Multiple Sizes of Ad Units There are different sizes of ad units available


Applying for a Chitika Account.

Metro Simple Premium Blogger Template Free Download

Metro Simple Premium Blogger Template


Metro Simple Premium Blogger Template


Blog Template Name: Metro Simple Blogger Template
Template Type : Free Blogger Template
Author:  blog.nguoiaolam.net
Designer: Hong Hoa
Basic Instructions : How to install a Blogger template

Metro Simple is a free premium blogger template with 2 columns, 1 Right Sidebar, 1 Sidebar, 3 Columns Footer, White, Blue, Fixed width, Magazine, Menu Links, Top Navigation Bar, Bookmark Ready, Header Banner, Adsense ready, slideshow, social bookmarking icons, posts thumbnails, tabs, drop down menu and threaded comments ready.

Templates Blogspot - Johny Tubeprett


TEMPLATE FEATURES

Johny Tubeprett template made for video content only from Youtube. There's so many feature in this template. It's a white and brown color with 4 column blogger in there, easy loading with elegant looks, 1 right sidebar, 3 columns footer, navigation drop down menu, grid and list style, tab widget categories, clean design template, tag H1 and H2 ready, and more. This template suitable for video content blog with daily updates only from Youtube. But you can use it for any gallery images content for your blog. For more detail about how to installation and customize this template please visit this link.

Template Name : Johny Tubeprett
Author : Maskolis
Url Instruction : Creating Website
Designer : Creating Website
Url Designer : www.maskolis.com

I suggest you to save any javascript in this template with your own Google Code or another file hosting for better result. Read this tutorial to save Javascript in to your own Google Code.

If you found no answer in this site, please visit my other blog in maskolis.com.

Submit your Websites to Search Engines for Free

Search Engines

Submit your Websites to Google, Yahoo, Bing Free
Search engines are programs that search documents for specified keywords and returns a list of the  documents where the keywords found. A search engine is really a general class of programs, but the term is often used to specifically describe systems like Google, Bing and Yahoo! Search to help users search for documents on the World Wide Web.

In order for the three SE giants to simply sight or index your websites, you need to submit them first to their information. Below square measure the best way to submit your websites.

Submit your Site to Google


To submit your website to the Google index, all you have got to try to to is go to www.google.com/addurl/. Enter the URL for your home page into the suitable box (including the http://), add any comments you may have concerning your website, so click the Add URL button. That’s it! Google can currently add your website to the Googlebot crawl list, and your website can seem in applicable search results.
For advanced users, visit https://www.google.com/webmasters/tools/.

Submit your Site to Yahoo


Submitting your web site to Yahoo! is an equally easy method. go to http://add.yahoo.com/fast/add?54397758 click `Standard Consideration > Continue . Taking the easy approach, all you have got to try and do is enter your website’s computer address into the Submit an internet site or Webpage box; certify you embody the http:// prefix. once coming into your computer address, click the Submit computer address button, and you’re done.
For Advanced Users, Click "Yahoo! Directory Submit"


Submit your Site to Bing/MSN


Google and Yahoo! are simply two of the large three search engines; you must also submit your website to Bing/MSN. visit http://www.bing.com/toolbox/submit-site-url and enter your entire website URL into the box (including the http://) and so click the Submit URL button. like the Google and Yahoo! submission services, Live Search’s MSNBot crawler are instructed to crawl your website and index all the internal pages linked from your home page.
For advanced users, visit http://www.bing.com/toolbox/webmaster/

Templaces Blogspot - Johny Movie Prett

Templates Live Demo
TEMPLATE FEATURES

This is a gallery template blogger for your movie content, named Johny Movie Prett with the dark style color black and orange. This template was designed for gallery content blogger especially for your movie collection. I made the main slider with 10 posts in homepage that shows your recent post. There's no sidebar in main page, 5 column blogger in there, adding meta tag H1 in every posts, automatic Lofslidernews, i left sidebar in homepage and 1 right sidebar in postpage, 3 columns footer, navigation drop down menu with no javascript, tab widget category, clean design template, and more. This template suitable for gallery content blog with daily updates. But you can use it for any gallery images for your blog.


Template Name : Johny Movie Prett
Author : Maskolis
Url Instruction : Creating Website
Designer : Creating Website
Url Designer : www.maskolis.com

I suggest you to save any javascript in this template with your own Google Code or another file hosting for better result. Read this tutorial to save Javascript in to your own Google Code.

If you found no answer in this site, please visit my other blog in maskolis.com.

How to Convert Images into Black and White Using CSS

Today tutorial i will tell you how to change the color images into black and white using simple script. This code has the ability to make images into black and white using CSS. Turn images into black and white without having to use Photoshop and other image editing softwar .
It is always nice to turn your colorful images into black and white in your web design work. Adding such a grey-scale effect on images is useful for gallery and hover effects designs.

Check out the demo below:

Convert Images into Black and White

Click Here for More Live Demo:

How can Add Css Code into your blog.


  1. Go To Blogger > Design > Edit HTML
  2. Search (Ctrl+F) for  ]]></b:skin>

Past below code above ]]></b:skin>

#bk-grayscale{
background:url("1.jpg")no-repeat;
filter: grayscale(100%);
-webkit-filter: grayscale(100%);
-moz-filter: grayscale(100%);
-ms-filter: grayscale(100%);
-o-filter: grayscale(100%);
}
And put the below code where you want to show images.

<img id="bk-grayscale" src="IMG URL" />
 Change IMG URL with your image URL

And if you can add only one image on post or widgets then only put below html code


<style>
#bk-grayscale{
background:url("1.jpg")no-repeat;
filter: grayscale(100%);
-webkit-filter: grayscale(100%);
-moz-filter: grayscale(100%);
-ms-filter: grayscale(100%);
-o-filter: grayscale(100%);
}
</style>
<img id="bk-grayscale" src="IMG URL" />
Change IMG URL with your image URL

Hope I was able to explain everything to the point. You can use other options along with grayscale filter on the images like hover effects and gallery stuffs without the need to use Photoshop or any other image editing software.

How to Create Google+ (Plus) Fan Page for Website/Blog

How to Create Google+ Page

Google recently introduced Google+ Page. Many people take advantage of it and still many new users do not know much about it so today tutorial i have tell you  how to create google+ plus for your business and individual website or blog. and many user use defult blogger profile they how can move blogger profile to google + plus Pages. it is very similar to the Facebook Fan Pages.

Why Use Google Plus?

Google+ Pages that a media business promotion, brand, organization, until the web / blog.
I  see so many advantages Google+ Pages, such as to unite the fan or follower of the blog in a major media as well as serve as a medium of information for them about updating the blog.
Associated with the profile, of course, use that profile integrated (sourced from one profile to all kinds of Google services) makes it easy to fit into a variety of services with just one click without having to log in repeatedly.
it is very similar to the Facebook Fan Pages.

How to create a Google+ Fan page

1. Go to this page  here you will find many category page. To create a page for your site then click Product or Brand
How to Create Google+ (Plus) Fan Page for Website/Blog

2.Select a category click website and click Next
google profile for blog

3. Enter the Blog Title and URL as Follows and Tick the Agree Page Terms check-box and Click on Create Button.
How to Create Google+ (Plus) Fan Page for Website/Blog
4. Enter the Tagline of the Blog and Upload a Profile photo (if any!)
5. Share your page with friends after complete click Finsh

 To Grow your fans and Audience, add the official Google+ page badge to your blog.
Click here to create blogger badge for your blog


How to Transfer Blogger Profile to Google Profile


You have created the Google + account​​ already follow above method.
1. Logged into Blogger
2. Go to Dashboard
3. Select the tab  Google+ and select the Upgrade Google +,see the below picture:
How to Create Google+ (Plus) Fan Page for Website/Blog

Tick the I have read above check-box and Click on Switch Now
How to Create Google+ (Plus) Fan Page for Website/Blog
Now move on To your Google+ Plus Page.
How to Create Google+ (Plus) Fan Page for Website/Blog

After the process is complete, Blogger will display Google+ profile (name, profile picture, and information) on the blogger profile gadget (if installed) and when my friend made ​​a new post or comment (name and profile picture) , but the old posts and comments have not changed. If my friend was not satisfied with the integration of Blogger to Google+ profile, do not worry. Blogger profiles can be restored to the condition, such as that already noted above, the return (revert back) Blogger from Google+ profile no more than 30 days after the integration is performed. trick? Just go to Blogger revert profile and finish.
Good Luck & Happy Blogging

More

Search This Blog