Showing posts with label How To. Show all posts
Instagram
Let's be honest. You are not a blogger 24/7. Sometimes you like to live life a little and capture moments. "The best camera is the one that is with you," uttered world renowned photographer Chase Jarvis.

Our smartphones accompany us everywhere. We use our phones to text. We use our phones to listen to music. We use our phones to watch videos. We use our phones to play games and we use them to take pictures

iPhonegraphy, is a popular form of photography that revolves around pictures taken with the iPhone. Our trusty devices give us the opportunity to be creative and take pictures anywhere and with ease. I am going to show you how easy it is to add an Instagram Widget to your Blog.

Why add an Instagram Widget In Blogger?

You have to understand that we are a visual society. Pictures and videos are shared more than any other medium. The highly popular mobile based social network, Instagram, works like Twitter but your updates are strictly photo based. 

As a blogger this gives you the opportunity to showcase your personality beyond the words that you type. Instagram also gives you the power to showcase your business and other hobbies. 

If you excel at designing blogs, for example, Instagram gives you the opportunity to share your work flow, your work station and even new templates. 

The possibilities are endless. 

How to Add An Instagram Widget In Blogger

  1. Go to Template >> Click Backup / Restore Button >> Download Full Template (In case you messed up)
  2. Go to Layout >> Add Gadget >> Select HTML/Javascript 
  3. Open another Tab >> Go to Instagme website - http://www.intagme.com/
  4. Put in your username >> Select Grid or Slideshow (Grid will have them show up like they do on Instagram while Slideshow is just a slideshow of your images)
  5. Select your Thumbnail size (100 px is the default) >> Select whether you want a Photo Border or not
  6. Decide if you want to change the Background Color 
  7. Preview your creation. If you like it select Get Code
  8. Copy the code into the HTML/Javascript section and save the widget 
  9. Preview your page layout. If you like it Save Arrangement
  10. This widget updates as you update your Instagram
Note : The best place for this widget is the sidebar. 

Final Words

Instagram appeals to professionals and amateurs alike. 

You can really spice up your blog with this addition. Remember that Instagram was bought out by Facebook so you can let your Facebook followers know that you have an Instagram account.

Source
If you want to available chat with particular friends but not others or chat with only few friends or Turn off Facebook chat for all friends follow this all video tutorial
In today's video tutorial Learn about How to Disable Popup in Google Chrome Browser When you open any website sometime other pop up page are showing so if you want to turn off popup in your chrome browser follow this step.. Open your google chrome browser.. Click on the wrench icon to the right of your address bar From the menu drop down menu, click on settings Show advance Setting Privacy and select content setting find the popup.. and enable Do not allow any site to show pop-ups (recommended)
How to Remove Facebook Search History | How to clear Facebook Search History | How to Delete Facebook Search History check this video for easily remove-delete your facebook search history

What is Jobego?


Jobego is a free service that allows you to earn money online by doing things you do every day — surfing and searching the web, doing social activities, completing special offers and polls. It’s simple and fast.

How do I earn money with Jobego?

Here are only several ways for you to earn money with Jobego. First is by completing tasks, offers, participating in surveys etc. You can also earn by browsing sites that are in our system. You earn commissions for every website you see. Other ways you can earn is through promoting others to our site using our referral system. You earn downline click commissions, upgrade commissions and a commission from your referrals's purchases.

How much can I earn?

The amount of money each user earns depends on the following factors: type and quantity of tasks the user has completed, the user’s rating, number of referrals the user has and amount of money those referrals make (we pay 10% of earnings of your referrals).

Who are referrals and how much can I earn on them?

Referrals are users like you who have registered in Jobego using your personal linking code. You get paid 10% of their earnings. The more referrals you have the more you earn.

Payments


When do I get paid?
Within 7 days after you request a payment.
How do I get paid?
Via Paypal, Payza or Webmoney.
What are the minimum payout and fees?
Minimum payout is $5.00. Fees for Payal payments is 2%, for Webmoney payments 0.8%.

Click Below Banner and Register

How to get lots of twitter followers in www.afollowers.com?
AFollowers is a powerful system to gain new followers for free.
www.afollowers.com is one site that can add followers on " Twitter "easily enough 1x click and you will get a lot of followers. :)

Simply follow the below STEP:
  1. First login to http://twitter.com
  2. After login to twitter go to this link: http://afollowers.com/
  3. It will appear like this, and click " Login With Twitter ".
Afollowers Login - Increase Twitter Followers

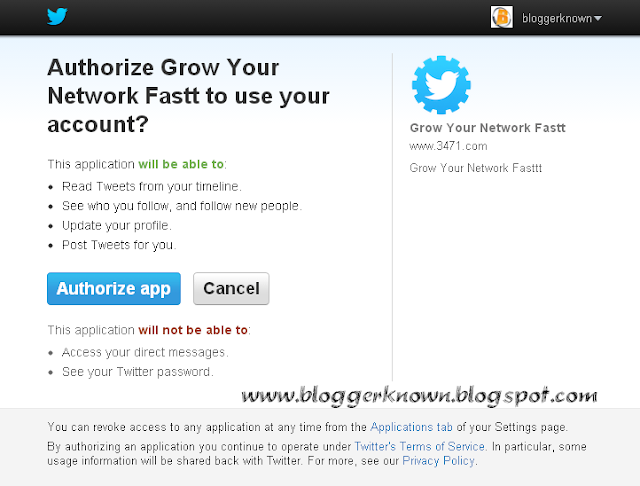
4. Click Authorize app

Twitter - Authorize an application - Increase Twitter Followers


5. And click " Get Follower Now ", you will be a follower appropriate" credit "you have, First time using this application you will get" 50 Credit "
1 Follower Need 5 " Credit "
Click on GET Followers Now

How to get Credit?
1. Click on "Gain Credit "on the tabs above.
Afollowers gain credit

2. Share your referral link, and everyone who signs up with your link, you will get a " Credit ".
Afollowers referral link

For those who want to follow each other with me, please follow @bloggerknown .
Disqus is a comments platform
Disqus is the new comment management system, most of bloggers and website owners used mostly.it is currently serving over 750,000 websites, In this article i am going to tell you about how to add Disqus comments system with a few fast steps, you'll upgrade your recent comment system with a new way to interact your guests.


Normally you don’t need to add the other comments system, because each website platform has their own discussion platform.But they're recent system. And if you're very little uninterested in blogger’s built-in system then you'll add Disqus comment system. This comment system can create your blog more professional. most important factor is, If you add disqus then comments are indexable by search engine therefore it's SEO Friendly. this system, not just the for blogger you can also add this system to Wordpress, Blogger, Tumblr, Universal Code,  Squarespace, TypePad, MovableType, Drupal and Joomla.

Why should we use.?
There are many good features with Disqus comment system after we comparison it with Blogger default comment system.
  • Realtime comment system
  • Notification and reply system
  • Inline media embedding
  • Mobile commenting
  • Social integration
  • The Community Box
  • Liking and sharing
  • Moderation tools
  • Spam-Be-Gone
  • Mobile apps
  • Blacklists and whitelists
  • Import and export
  • International languages
  • SEO-friendly and local sync
  • Theme customization
  • Tweets and reactions
  • Profile management
  • Activity streams
  • Connected communities
Follow the steps.
1. At first you need to register a free account for your website on Disqus website. Go to disqus.com and click "Get this on your site" fill registration form, Give your Site URL, Site name, Site Short-name  Create your Disqus account by giving username, password and email address.(Do not forget to verify your identity though email verification) Then click Continue.

DISQUS - Register site
2. After pressing the Continue button, a new window will appear, which will ask you to select a Platform. Just Select "Your Platform(Blogger, WordPress)" from the list and proceed to the next step.

Choose a platform - Settings - DISQUS

3. Next click “Add disqusname to my Platform (WordPress,blogger, type-pad & other) site”
follow given instructions & continue all steps

4. Your comments system is ready and look like below screen short..

Blogger Known DISQUS comments system

Today tutorial i will tell you how to change the color images into black and white using simple script. This code has the ability to make images into black and white using CSS. Turn images into black and white without having to use Photoshop and other image editing softwar .
It is always nice to turn your colorful images into black and white in your web design work. Adding such a grey-scale effect on images is useful for gallery and hover effects designs.

Check out the demo below:

Convert Images into Black and White

Click Here for More Live Demo:

How can Add Css Code into your blog.


  1. Go To Blogger > Design > Edit HTML
  2. Search (Ctrl+F) for  ]]></b:skin>

Past below code above ]]></b:skin>

#bk-grayscale{
background:url("1.jpg")no-repeat;
filter: grayscale(100%);
-webkit-filter: grayscale(100%);
-moz-filter: grayscale(100%);
-ms-filter: grayscale(100%);
-o-filter: grayscale(100%);
}
And put the below code where you want to show images.

<img id="bk-grayscale" src="IMG URL" />
 Change IMG URL with your image URL

And if you can add only one image on post or widgets then only put below html code


<style>
#bk-grayscale{
background:url("1.jpg")no-repeat;
filter: grayscale(100%);
-webkit-filter: grayscale(100%);
-moz-filter: grayscale(100%);
-ms-filter: grayscale(100%);
-o-filter: grayscale(100%);
}
</style>
<img id="bk-grayscale" src="IMG URL" />
Change IMG URL with your image URL

Hope I was able to explain everything to the point. You can use other options along with grayscale filter on the images like hover effects and gallery stuffs without the need to use Photoshop or any other image editing software.
Create a Beautiful Your Blogger Blogs
Blogger Template Designer is a new way for you to easily customize the look of your blog. You can select a variety of templates, images, colors, and column layouts to make your blog an expression of you.

If do you want to use own blogger Templates Click Here

If you want to use customize blogger Templates Follow the step and install a blogger templates in blogger.


Download your new blogger template to your computer. If the template is contained in a zip file, ensure you have extracted the XML template.
Note:  Upload only xml file for blogger templates
  1. Login to your blogger account
  2. Now just select Template and you can see bellow button at the right hand side.
  3. Now just click on backup / restore button and one box will pop up (you can see it in bellow snapshot)
  4. Now simply browse your template and click on upload and you have done !
You can also change the arrangement of the widgets using layout.


install blogger template


That’s all Don’t forget to subscribe and  use the comment box for your valuable thoughts

More

Search This Blog